Tuesday, April 28, 2009

Equipment - Which Group Should I Buy, Part 1

Or, as I should call it, Why Derailleurs Look Like They Do Now. And then I'll discuss why this is significant when you go and select a component group.

Recently I had discussions with two of my friends about what direction to go with when it came to groups. Since ErgoPower came along I've been a diehard Campy fan, liking the separation of brake and gear (levers, that is), the ability to dump multiple gears, and the ability to once again run a full Campy bike.

See, before that, somewhat unbelievably, I used Suntour derailleurs, Dia Compe brakes (whose company was so close to Suntour that they made Suntour brakes), Sugino (Suntour cranks and bottom brackets), and the ubiquitous new Sedisport chain (probably the quietest chain out there, cheap, and flexy enough to shift well).

At that time racers could select between Campy, the acknowledged leader, Suntour, the Far East Campy, or Shimano, the, err, Far East bastard son who kept thinking up wacky ideas because no one could really improve on the Campy level quality. I mean, how could you develop higher quality metals, better bearings, or more durable components? You couldn't. So companies either tried to be like them (Suntour) or make functionally different things (Shimano).

One of Shimano's ideas involved a freewheeling chainring (the crankarms freewheeled separately from the chainrings) combined with a fixed gear rear 5 speed freewheel. Since the cranks turned whenever the bike moved, you could shift whenever the bike moved, even if you weren't pedaling. Tellingly, Shimano had to use a solid wire for a shift cable, with a lever that could push or pull it. A regular cable was too unpredictable, but the solid wire had absolutely no stretch or compression. Shimano added stops for each gear - it was indexed.

I had started out, in my pre-racing days, subscribing to the Campy Way. Cold forged aluminum, super high quality bearing races, one level of quality and performance (high), beautiful old world craftmanship, and a link to the man that made bike drivetrains what they were - Tullio Campagnolo.

There were other Campy features - the 144mm bolt circle diameter for one. Suntour used it too, like a little brother copying his older one, but Shimano used 130mm, because, well, because no one else was using it. Campy's bottom bracket axle taper worked well for their cranks, and Suntour's also, but Shimano used the Japanese standard, and you had to use Shimano BBs with Shimano cranks.

I digress, slightly.

Of course my first race bike had Campy derailleurs and shifters. I couldn't afford everything else (most of the bike was Excel Rino, and it came with Modolo brakes), but that would come with time. I moved to a Shimano parallelogram rear derailleur when I went to a Suntour bar end shifter (complete with the wiggly stainless steel cable housing) because such shifters require a bit more precision than the predictably vague Campy rear derailleur. The stainless housing didn't help any, but it was cool looking so I used it. Plus I could lube the cable simply by pouring TriFlow all over the housing.

Ironically that's when I could afford a Campy crankset, and so I paired my odd drivetrain with a Campy crankset and a Super Record front derailleur, one still connected to a downtube shifter, and it shifted immaculately. How could it not, the cable was about 2 feet long and probably twice the thickness of today's derailleurs, and the return spring was one for men, not boys, and required the shifter to tug the shifter pretty hard.

Wait, you ask. What's a parallelogram derailleur? And why wouldn't a Campy rear derailleur work with a bar end shifter?

Get your popcorn, gather 'round, and let's learn a little history.

Before indexed shifting ("click-shifting"), all the different companies worked with all the different companies. Riders would readily mix shifters, derailleurs, cranks, chains (most groups had no specific chain). In fact, groups were so non-specific (i.e. universal) that Campy, Shimano, and Suntour would leave the chain and possibly the freewheel up to other manufacturers, usually ones that did a better job of it. Sedisport made great chains, and Regina made the most in-demand freewheels (there were no cassettes for a long time).

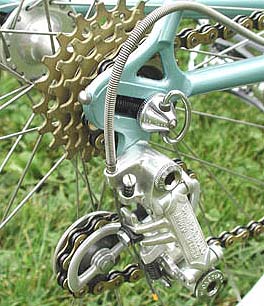
Campy's initial parallelogram rear derailleur. I refer to the two derailleur plates as the "parallelogram". (Image from Sheldonbrown.com)

You can see some non-derailleur items in this picture, like the Regina freewheel (with no special shifting ramps - the little groove at the top of each cog was their "shifting secret"), the Regina chain (it's sort of rough looking, like a BMX chain), and finally the floppiest housing ever, the stainless steel uber-expensive derailleur housing I lusted after.

On the derailleur, though, you'll notice something much more significant. Note how on the Campy derailleur the two plates drop straight down from the upper derailleur bolt. Due to the pivot axes of the plates, the derailleur pulleys will initially drop as they move inward, then rise back up a bit. The pulley cage has to rotate to keep the pulleys closer to the rear cogs.

With this design it's difficult to get the upper pulley closer than, say, two or three links from the cogs. In fact, the obscured bit of chain, between the top pulley and the freewheel, only touches air. This means that you have a lot of slop when you shift. This necessitated the Campy Overshift, a technique everyone learned where you shift past the intended position to get the reluctant chain to move off its starting cog, and then shift it back a bit so the pulley lined up with the target cog.

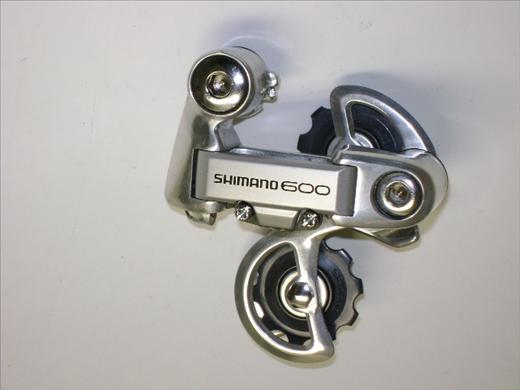
Shimano's parallelogram. I ran this type of derailleur for many years. Note the L-shaped piece at the top, which turns the parallelogram on its side. (Image from VeloBase.com who got it from eBay seller coffeeride)

Shimano improved on Campy's design by tilting the two plates so they sit almost horizontal, not vertical. The derailleur pulleys now move back and forth without the downward/upward arc (the arc moves the upper pulley a little more in front of the cog, then back a bit). This lets the upper pulley sit closer to the cogs, and allowed the derailleur to move the chain without necessitating any kind of overshift.

The only problem with this design was that it took an unpredictable amount of cable movement to make said shift. In the middle of the freewheel range, the derailleur was further away from the cogs than at the ends. This derailleur was always a bit iffy on the smallest cogs, and the upper pulley would rub large cogs readily. Using a super long chain would allow the upper pulley to sit closer, but you'd get massive chain bounce in the small ring.

Suntour's slant parallelogram rear derailleur. I ran Suntours towards the end of my barend days, just before Ergo. Note how the parallelogram points up towards the upper pivot bolt. (Image from Kinetics)

Suntour made one more improvement to the parallelogram soap opera - they tilted it. Note how the two plates now tilt a bit, as opposed to the flat profile the Shimano derailleur presents to you.

This immense update allowed the derailleur pulleys to follows the slope of the cogs.

Let's repeat that, because it's important.

The slanted parallelogram design allows the upper derailleur pulley to follow the slope of the cogs as it moves across the cogs.


A given amount of cable travel would move the derailleur a given distance. It shifted well at all ranges of the freewheel, and it could handle larger cogs than, say, the Shimano design, typically two more teeth than a similarly designed derailleurs.

Although the ingredients were in place for the next step, Suntour couldn't, or wouldn't take it. The bicycle drivetrain world sat in stasis.

Then came the fateful day when Suntour's slant parallelogram (second) patent expired.

Shimano had obviously been planning changes around this date for some time, because shortly after Suntour's excellent rear derailleur design became available for anyone and everyone, they introduced a high end index shifting system. The new system had a few significant features:

1. Shimano invented an upper derailleur pulley that had lateral movement, to allow it to automatically adjust for small derailleur misalignments.

2. They used a compressionless housing, one that didn't flex at all when tensioned. This meant that any shifter movement translated into cable movement, not housing flex. Said housing also had a slippery lining, one that the uber-cool stainless housings lacked.

3. They developed a low-friction (small diameter) cable that slid easily in the above lined housing.

4. They combined this with their own chain and cog design, one developed from their Uniglide line of twisted teeth cassettes and bulging sidewall plate chains. These new products helped the derailleur move the chain sideways under pressure.

5. Shimano started off the acronym war with the first widely used cycling acronym: SIS, for Shimano Index System.

The system worked.

With indexing came a whole host of related issues. Suddenly companies needed to have predictable performance from the previously ancillary pieces. First off, the "sloppy" top pulley became a necessity so that minor adjustments to derailleur position happened automatically. Second, the chain and the cogs had to work together. And finally, the system had to use compressionless housing, and a cable that, once broken in, didn't stretch at all.

Shimano started specifying specific chains and cassettes, and everyone rushed to make their version of non-stretch derailleur cable, non-compression housing, better shifting rear cogs, a spec chain, and some wiggly upper derailleur pulley.

For a while only Shimano had a system that worked well. Suntour's first attempt failed miserably, and Campy, well, Campy stubbornly stuck with its old, outdated rear derailleur design, and that would never, ever index properly.

Their market share dropped accordingly.

Shimano happened to introduce SIS just as the mountain bike craze hit the public. Suddenly a whole bunch of people who had no idea how to shift were buying bikes with 21 or 24 speeds. They needed indexing.

Suntour almost made their system work, survived by the skin of their teeth. Campy trudged along, selling systems to the lonely road riders in a sea of mountain bikers.

Then, in the late 80s, Shimano came out with STI, their brake lever - shift lever combination. Racers screamed for similar systems from Suntour - the Tour du Pont was won when an STI equipped Lance accelerated away from a downtube shifting (or not, in this case) Raul Alcala.

Racers had to have a bar mounted shifter. (And why Alcala didn't have a bar end shifter belies belief, since Suntour had an excellent bar end shifter, but that's another question).

Campy finally, belatedly, introduced the Ergopower levers, adopted the slant parallelogram derailleur design, and pulled themselves from the edge of extinction.

Suntour, with its failed Command Shifter (and no other viable ideas other than the Barcon), died an inglorious death. Their inability to invent a brifter killed them.

The world now is a bit different. No more Suntour. People talk about "drivetrain kits". Brifters. No one knows what freewheels are anymore.

And, finally, a new company popped up: SRAM.

So when someone starts thinking about road bikes and what drivetrain to use, you have to decide between Campy, Shimano, and SRAM.

Which one should you get?

Stay tuned for Part 2.

Saturday, April 25, 2009

Life - Killer Instinct, Part 2

A short time ago I had a short (email) conversation with a local friendly Cat 3 racer, a result of my post on "killer instinct". The exchange centered around how we both started riding as kids, and how we both, somehow, have kept the competitive fires alive for decades.

Part of what he wrote:

"I remember when I was ~13 years old and starting out racing my bike, I used to see you with the "actual size" Cannondale. You were already a fixture on the racing scene. After all these years of racing I have seen guys come and go; I have watched guys race for "personal glory", and to satisfy their ego (which is all well and good. I suppose we all do that to some extent). But many racers who do it only for those reasons fall out of the sport. Guys like you love bicycles, bicycle parts, racing, riding, all of it. I have a tremendous amount of respect for guys that do it, year in and year out, because they love "bike riding". I get that sense from you.


Lets make it a point to go out for a long weekend ride sometime this summer. We will each invite some trustworthy guys that won't turn it into a race and we can just go out and ride, for riding's sake."


As he suggested, we decided that the best way to talk about things is to go on a long ride and just talk. We have yet to set a time for this ride, but it's one of the few rides that I'm looking forward to doing this year.

At about the same time, another good friend of mine asked me what I'd ask a certain Joe Parkin if I could ask him, say, 10 questions. My questions, in a reply on April 17th of this year, were as follows:

1. Currently racing rider you most respect, if any. Ditto team, ditto director.
2. Ex-racer you most respect. Ditto team, director.
3. Briefly, what advice would you give a new Elite lever racer?
4. Do you currently coach or advise any riders, teams, directors, etc?
5. Do you ride now?
- If so, what bike?
- Do you use power, HRM, cyclometer, nothing?
- Do you "train" or just ride?
6. Favorite bike you raced, and why. (I believe he mentions a bike he likes, but he doesn't really say why)
7. Typical training week back then, say during a break, if you weren't in the Tour, etc.
8. Dirtiest riding you've ever done.
9. What drove you to write your book? Will you write another one?
10. Do you do any grassroots racing? i.e. USAC racing.
11. What kind of music did you listen to back then? Now?
12. What other interests/hobbies do you have?

Then, on cyclingnews today, I saw an interview with him. I suppose my questions were pretty generic because he answered some of the same questions.

Based on what I read, I could make a few deductions. First off, I guess he's writing a new book (!). Second, he mentioned Adri Van der Poel, a guy I briefly ran into during my trip to Belgium. And finally, he is really good at shooting rifles, a skill that I've been fascinated with ever since reading the Bob Lee Swagger books (especially A Time To Hunt). The only difference is that I haven't pursued the last skill in any way except to learn how hand guns work, whereas he's become a top level long gun handler.

Mr. Parkin seems like a character with incredible depth. He has incredible cycling talent, but that seems to be just the surface of his character. I have a feeling it would take a long time to unearth some of the treasures he has to offer, something more than just an interview.

Perhaps a long ride would help talk with Joe. A ride that respects the group's members - no egos, no half-wheeling, no stupid attacks, no yelling, respect for motorists, along some nice, quiet stretches of road. Two by two when it's safe, a smooth paceline when it's not. And, for my benefit, a gentle pace up the climbs. Or at least some regrouping at the top.

I wonder if Joe is free for a long ride some day this summer.

Friday, April 24, 2009

Equipment - Why Tubulars?

On the bike forums someone asked a standard question for those who ride on the road, one that seems much more pertinent after my little tutorial on gluing tires:

Why tubulars?

Such a simple question, such a difficult answer. Especially after reading a couple posts on how to change a tubular tire (and how long it takes to finish it). Let's put it this way - a tutorial on changing a clincher doesn't take two posts to complete.

So, let's ask again. Why tubulars?

Tubulars are fun. They put you in a different mindset. It's that flahute mindset, the gritty lowlander Euro pro who rides box section rims over all sorts of adverse terrain and makes it look easy. Or the sleek aero Tour look, skimming along on tall, dark, logo-covered carbon wheels. You can subscribe to either fantasy but both of them work better on tubulars.

Tubulars (or sew-ups) are tires that have a tube sewn into them (hence "sew-up") instead of a tube that is easily separated from the casing. The latter type of tire is called a "clincher", because the tire has a bead that clinches the rim.

This is where a neatly cut up tubular would come in handy, as well as a neatly cut up clincher. Let me get my sheet metal sheers and I'll be right back.

(Okay, since we're in Vegas right now, and I didn't find a tire I wanted to cut up before we came here, I don't have a picture of a real cut up tubular).

There are a number of reasons for using tubulars.

The primary one, for a racer, comes from the tubular tire system's lighter weight.

Although the tire itself may not weigh substantially less than a clincher/tube combination, the rim can be built significantly lighter. Zipp's lighter tubular wheels are down to 1000 grams a set, where as a light clincher set costs you 300-400 grams more.

The reason is the tubular tire holds its own pressure - pump one up to its maximum pressure while unmounted from a rim and it'll just turn itself inside out. Pump up an unmounted clincher and its tube to anything over 30 or 40 psi and you'll have a gargantuan tube that will, at some point, explode in your face. In fact this used to be the preferred "starting pistol" at some mountain bike races in the area (Mount Snow, to be exact). Clincher rims have to be strong enough to hold in that pressure; tubular rims do not. Because of this structural requirement, clincher rims inevitably weigh more than a similar tubular rim.

Even a perfectly good clincher rim may be manufacturer limited to a certain pressure. For example, Campy limits their super expensive Hyperon clinchers to only 118 psi. Imagine what happens to that rating after you slam that sharp edged pothole while cruising along at 30 mph in the middle of a crit. Speaking of which...

A second reason cited for using a tubular addresses durability.

Because the tubular rim has no bead, it has a correspondingly low chance of pinch flatting. The round tubular tire construction means there is very little chance to pinch the tube between two parts of the tire wall.

This means you can ride lower pressures without too much worry about flats. Tubulars seem to be softer anyway, but see my disclaimer line at the end. Whatever, I can ride 170 psi if I want to, or down to 120 psi, and it feels fast and resilient either way. As a note, my Contis need 170 to feel fast, and it's not skittery at that psi, CXs are good at 110-120, 140 on an "A" day.

I've only seen one guy double flat tubulars, and that happened right in front of me. A friend had a pair of TriSpokes and, at about 45 mph, hit something so hard that not only did he flat both tires, he also dented both rims. I later bought them from him, bending out the sidewall bulges with ChannelLocks, but the rims were never the same. Yet I raced on them regularly for the last ten years or so.

I also got a pair of similarly damaged clinchers. But because the sidewall is integral to holding the tire's shape properly, I had to lace new rims on them to make them usable.

With tubulars your tire doesn't depend on a perfectly formed rim wall to contain its high pressures. The tire holds its own pressure. In addition, the tire relies on glue to hold itself onto the rim, unlike a clincher.You can ride the most banged up, dented, crazy weird tubular rim with 100% confidence because the rim only supports the base of a tubular tire - it does not do any air pressure related work, nor does it retain the tire in any significant way.

I was amazed at how bad the wheels were that the pro teams Z and Gatorade were riding in the now-extinct Tour Du Pont. On the Hershey stage I spent about 2 hours watching mechanics work on bikes after the day's stage. My "pros ride awesome bikes" myth got shattered that day while I watched the best pros's bike getting worked on by tired mechanics. Some wheels were bad enough that I would have swapped out the rims, but the teams just keep them going. One mechanic put Superglue into some cuts on Lemond's tire, albeit after some discussion about replacing the same tire. However, for lessor riders like Gatorade's Dirk DeWolf, for example, he had such major flat spots on his rim that it must have shaken out a filling or two any time he went over 30 mph.

Yet these bent up tubular rims have about the same functional strength as a straight tubular rim. On the other hand, a messed up clincher rim is just asking for trouble if the tire doesn't seat properly. Your tire may blow off such a rim at any moment, with no warning. I'm sure you've seen (or heard of) rims that blew apart due to overly worn sidewalls. This will happen on clinchers, but not necessarily on tubulars.

Tubulars also let you ride even after you've flatted.

You can do this because when the tire goes flat, it becomes flat and somewhat firm due to the fact that it's glued in place. A clincher tire, on the other hand, becomes a wiggly thing that goes all over the place because it relies on air pressure for securing the tire in place as well as its shape.

With a flat tubular you can go quite fast in a straight line. I wouldn't recommend going too fast in a curve, and for hard turns you'll definitely have to slow. Part of the speed depends on how well you glued your tires - I use a screwdriver to start peeling the tire, and only after about 1/2 of the tire is off can I rip the rest off by hand.

One (Pro) Worlds was won on a totally flat rear tubular. If it was a clincher he'd have been screwed:


Fricken awesome clip. Insane.

Longer non-English version, with 6 more clips to give you the lead up to the finale:


Disclaimer line: I think there may be some cognitive dissonance factors (sound, "feel", etc) but I figure I'm just rationalizing riding tires that cost more than the ones on the missus's car. So I don't count them.

Would I train on them? Have I trained on them?

Sure.

Have I flatted them while training? Of course. Do I regret riding them? No. Even when I flat, after that initial shocking disappointment (usually I flat when I move over for traffic, then I berate myself for being to nice), a flat tire turns my normal, ho-hum training ride into a chance to, well, be a pro for a few miles.

So, yeah, what you do is train on them, and when you flat, you pretend you're Olano with 2k to go or something, and you go super hard till you get home. Then you see what you did to your rim. And maybe you regret spending a lot of money on the tire and the kind of dented up rim, but man was it fun blasting home on a flat. Or catching a couple guys out on a hard training ride. Or motorpacing some random cars at 30 mph. Etc etc etc.

Life gives you lemons, make lemonade.

That's the point to riding, right? Having fun?

Tubulars are cool. They're cool because they're light, they're fast, and they're fun.

Life - Break

In Vegas for a short break - therefore post frequency should suffer.

If it doesn't, something else is wrong.

Monday, April 20, 2009

How To - Glue a Tubular

Fail!

I did a horrible job gluing this tire. Although the tire had a slow leak that escaped my somewhat hurried overnight pressure test, the wheel would have been unrideable due to the immensely horrible glue job. Note how easily I can peel away the tire? The tire would have rolled off pretty easily.

Having said that, it took about 15 minutes of struggling to start separating the tire from the rim. Once I got the first 10-12 inches freed, the rest of the tire followed in a minute or so.

If you need to glue a tire on a rim, you're in the same situation I'm in now. So let's glue a tire. You have a tubular wheel, and a tubular tire. You need to mate the two. How do you do it?

First off, let's go over some competencies and responsibilities you have as a cyclist. A big one is that you have to take care of your equipment in such a way that your bike does not endanger others. If it endangers yourself, fine, you suffer. But if you endanger others, that's a real big no-no.

A "no-no" example is, say, improperly mounting a tubular tire such that it comes off while you're riding it. Big no-no.

Since tubular tires are not as easy to mount properly as a clincher tire, it's imperative that you do it properly.

(I should point out that mounting a clincher tire improperly will also lead to a tire spontaneously dismounting, and such an event may also cause problems for the rider and those around him. This phenomenon is not reserved for tubular tire users.)

With that thought always at the back of your mind, let's proceed.

Start with dry-mounting a new tire on the rim to stretch it. This means you put the tire on without using any glue.

In my case I stretched it for a while - probably 20 minutes - while I looked for my glue. You're really supposed to stretch your tires at least overnight, and preferably a week. Back in the day I'd get a bunch of tires and let them "age" over the winter - the rubber hardens a bit, making them less likely to puncturing, or so the myth goes.

Now I just mount whatever tire I have, whenever I need to mount it. In this case I've had the tires for a couple months. Not intentionally though. I bought them and told myself I'd glue them "next week". Then suddenly two or three months had passed, I had a race coming up, and I had to glue them like "right now".

Pump up the dry-mounted tires while you're at it - you want to discover any defects in the tires now, not after you've glued it (most stores will exchange a defective non-glued tubular but not any tire with glue on it). Don't go back to the store after 6 months though - if the tire is totally flat in less than a day, it's probably not good, and you should bring it back then.

Keep in mind that latex tubed tubulars (Vittoria CX, for example) will drop to about 40-50 psi overnight. Butyl tubed tubulars (Contis) will retain pressure like a regular clincher.

The "age your tubular" reality is that this is the time you check for defects. Aging the tire is less important. Nonetheless, tradition demands tire aging. So age your tires.

I do notice the tread firms up a bit over the course of 6-12 months of aging. It would make the tire less succeptible to picking up debris and such, and let it wear longer. I think. Whatever, it sort of explains why riders think aging a tire is good.

(Car tires, on the other hand, just get worse when they age. Competitive car drivers will know the manufacturing codes on the tire sidewalls so they can see how old a tire is - and they'll choose the youngest, newest tires possible, given the choice.)

You can also use the "aging" mount to practice tire mounting techniques. Since it's hard to take pictures around wet tubular glue, I took some when I was dry mounting the tire to stretch it.

Note the Pinch Hold.

This is not a special Ninja technique for disabling your victims, although someone demonstrated to me a special defense technique similar to this just the other day (and boy did it hurt). Instead, this is a good way to hold a tire whose basetape is covered in sticky, icky tubular glue.

Pinch and pull up. You'll be surprised at how hard you can pull up on a tubular tire when you have a panic attack because if your fingers slip you'll have glue all over everything that you forgot to cover when you started putting glue on the tire.

If that's how you hold the tire, how do you hold the wheel?

The Toe Grip. Requires either special Ninja Toe shoes or any pair of socks.

This is a particularly useful hold when you can't touch the top of the rim because it's covered in icky, sticky glue. I try to do this on concrete (the glue doesn't really gob off when it's tacky, which is what it should be) or on a piece of cardboard if I'm on the living room rug.

Not that I've ever mounted a tubular tire in the living room. Really.

Once you've mounted the tire, pretending that all the tire-rim touch points are covered in tubular glue (sort of like when you're a kid and you pretend that the stepping stones going to your front door are surrounded by lava, and if you fall off of them you... um, you have pretended that, haven't you?), you can take the tire off and put real glue on both the tire and rim.

As an overview this is what we'll be doing: First, we'll first apply a layer of glue to the tire and the rim. Once both applications are relatively tacky, we'll put a second thin layer on the tire, and a second thin layer on the rim. Then we'll mate the two and hope things are good.

Choose a tire. The good pile is up high, the questionable ones are below. I chose from up high.

Tire and a pump. Note how white the basetape appears.

To put glue on a tire can be tricky. It's hard to glue the inside of a hoop. It's much easier to glue the side of a hoop. Therefore, make the tire into a sideways hoop. How? Pump it up a bit.

No psi. And the tire will be hard to glue, especially the side that's facing the floor.

Hey! I'm a flounder!

The tire is now laying in such a way you can glue the whole base. Flounder-like, if you will. Cool. Takes about 27 psi it seems, according to my floor pump.

This makes things much easier to glue. Note that the tire suddenly got what looks like old glue on it. That's not an illusion - it's actually what happens when you first pump up a tubular. Glue squeezes out of the casing, covering the basetape, and dust and stuff will stick to it, making the tire look kind of old right away.

Okay, that's really not what happened. Heh.

After I looked at the brand new tire, I realized I hadn't pressure tested it. So I mounted it on a wheel I had laying around, pumped it up, and grabbed another tire. I figured a used tire that I just pulled off a good wheel would be fine (because it had been pressure tested, aged, and raced already), and I found one in the upper pile (hanging off the top of the closet doors). The tire came off my short-lived PowerTap wheel, so it got, what, like 20-30 rides on it.

Luckily it was a Vittoria CX, my favorite kind of tubular. Even more fortunate was that the tire had previously been used on the rear, so it had some wear. Since tubulars tend to actually wear out before they get cut or punctured, I try and rotate my rear tires to the front before the flat bit in the middle of the tread gets too wide. A tire with a wide flat spot feels weird as it heels over in a turn. This tire hadn't gotten to that point, so it's an ideal front tire.

You also need glue. Everything else is optional.

I like Conti's glue. I don't like their tires, but their glue works well. It's considered a "clear" glue, one that is translucent. Vittoria has one, so does Panaracer. I've used all of them, and they all seem pretty good. Panaracer seems to have the most solvents, Vittoria seems the thickest and least translucent.

*UPDATE: 2012, I am using Vittoria Mastik One, a clear type glue. I like it enough that I bought a box of it retail from a bike shop.*

Clement, Vittoria, and others have a "red" glue, which looks like oozy bone marrow. Or pureed liver. Something like that. I've used both and I prefer "clear" glues.

Red can get messy just from squeezing out from under a tire. However, I find that red will fill gaps better, it seems like I can use more without feeling like I'm dissolving the tire, and it's what I started using when I was a kid. Red glue takes more time to dry - definitely 24 hours, and preferrably 48-72 hours.

In the above pic, I have a half or 2/3 used tube of glue (the upper one) and a brand new yet-to-be-unsealed tube of Conti cement. The white piece of paper is actually the tag off the tire - it's strong (ripstop plastic-like paper), won't let glue through, and is a good size. It was also right there, a key factor when looking around for a perfect glue-spreading utensil. It looks used because I already used it to glue a few tires. I just lay it on the stand to store it, and it sticks to the stand on its own. Imagine that.

The truing stand is there to hold the wheel. It's possible to glue the tire without one, but virtually impossible to take pictures of oneself gluing said tire. Since I wanted to take pictures, and I had the stand, I used it.

If you have less than a full tube, make sure you have a second one. This especially applies if you have a brand new tire, or, worse, a brand new tire and a brand new rim. You can easily use a full tube of glue in such an instance.

Since cats and tubular glue don't mix well, here's a picture of a cat to satisfy my need to show them off.

This cat got caught up in a bunch of glue.

The vets had to shave it. Make sure that you've secured your gluing area from fuzzy pets, little kids, curious grandparents, and the like. "Gluey", as some named the above cat, has grown her fur back into a nice, dark, almost black color.

Now glue.

If you have any doubts about your clean gluing ability, wear some latex gloves during the process. If you have supreme confidence in your clean gluing ability, you can skip the gloves. And you'll find out for sure exactly how good you really are at gluing cleanly.

With glue, once you open the tube, don't squeeze it! I mean really, don't squeeze it at all. Just tilt it towards the tire and just nudge the end of the tube to encourage the glue to come out. Squeeze it and you'll have glue everywhere. Do a nudge squeeze, one where, if it was toothpaste, you wouldn't see the paste budge, and tubular glue will flow like, well, like toothpaste.

When pausing your gluing to destress and such, prop the glue so the open end is up. Or cap it. Don't let it point downhill because after you shake out your wrist or hit the head or whatever, you'll look at the tube and it'll be in its own puddle of glue.

Trust me, that's what happens.

Start at the valve.

How did you know I'd say that? Always start there so you know where to end. Also you can use the valve to turn the tire.

I find it easier to kneel on the floor (pretend you're looking for contacts on the floor), arc my hand using my elbow as the pivot point, and glue the section my hand arcs over. Then spin the tire a bit so your hand arcs over a different section, and glue that. Repeat until you get to the valve.

On tires, since the basetape's adhesive apparently dissolves from too much tire glue, go sparingly on the glue.

I think this is actually a myth, since folks put a lot of glue on the rim, and when you join the two together, that glue on the rim is now... on the basetape. Ultimately the basetape adhesive will lose grip and the basetape will start to peel. Since this happens after a bit of time, one might deduce that the glue caused it (because it doesn't do that on its own, not for a long, long time). However, it's possible that some other factor, like UV rays, degrades the glue.

Whatever. Tubular tires are part of that superstitious part of cycling, and if the legends claim that too much glue is bad for the basetape, so be it. I put glue on the tire sparingly but with good coverage.

I used that tire hang tag to spread the glue a bit. More consistent coverage, but thin because of the myth.

Now for the rim. I find it easiest to use a truing stand, but failing that, you can glue a rim, carefully, by holding it with one hand and gluing with the other. The latter method tests your clean gluing ability more thoroughly.

I just started this rim. Notice the wet glue. It looks wet even. Much more glue.

You can see the wet glue trickling a bit.

See how the glue is trickling down just to the left of the spoke hole in the middle (lowest of the three close together)? I put a bit too much glue. Use the tube end to spread such glue along the tire-rim mating surface.

Make sure that you glue around the spoke holes. Those little areas are hard to glue properly, and if you miss them, you're leaving yourself vulnerable to a tire rolling. Those missed spots are like perforations in your glue job. Get one spot loose as you dive into the last turn in a crit at 38 mph and you may find your tire popping right off the rim.

Using the tire lable to spread glue.

I felt it was important to upload this picture, but I forget why now. Look at it carefully.

Note the spiderweb kind of effect that bridges one of the spoke holes. That indicates the glue is getting a bit tacky. It is fine. Sometimes I've gotten enough glue on a rim that the whole spoke hole is hidden behind such spiderwebs. On this wheel, since I have to true it using those spoke holes, I've kept them open. On rims with exposed spoke nipples I don't care as much.

Once you have a layer of glue on the rim, spread it out. I try and use a discarded plastic bag or something similar. I've also used scraps of cardboard (bent a bit to follow the rim contour), even small brushes saved just for gluing tires. I like the baggie method best. Failing a baggie, a tire hang tag works fine. I fold it over my index finger, holding it in place with my thumb and middle finger, and spread the glue carefully.

When you're done with a layer on the tire and rim, and it looks and feels like it's sticky from edge to edge, wait for a bit until it gets tacky. Then you can do a second coat. This time you want to work a bit quicker - it's easier to set and adjust a tire when the glue is a bit wet.

I find it better to put a thin coat on the tire, spread it, then a slightly thicker than thin coat on the rim, and spread that. By the time you finish doing the rim, the tire's glue will have tacked up some, and it'll be ready to go.

You want some rim glue to be wet because it makes it easier to center the tire on the rim. Otherwise you'll be stuck with a wavey tire tread that wears weird and rides unpredictably. A squishy layer of glue on the rim is good.

Now you're ready to mate the tire to the rim. Remember to deflate the tire! It'll be hard to mount a flounder-like tire onto a normal rim.

Then, quickly, do the Pinch Hold and Toe Grip method and get that tire on, starting at the valve. Stretch and pull the tire evenly away from the valve, making sure the valve stays straight. The Pinch Hold comes in handy for the last few inches of tire, and the Toe Grip counters your Pinch Hold efforts. Your earlier practice will come in handy now.

With about 20-25 psi in the tire, roll it on the floor while pressing down.

This helps get the tire into contact with all that glue that you painstakingly applied next to the spoke holes. If you don't do this, and you inflate the tire a lot, the air pressure will lift the edges off the rim, and the glue won't have a chance to set. This results in just the center being glued, and that's not good.

Presto, you're done!

Or... not. You really ought to wait at least overnight to ride the tire, and 24-48 hours is better. Check your glue job - if it doesn't look like the last picture of in this post, it's not good enough. Do it again.

You want to see the glue clinging tenaciously like this.

If you don't glue your tire well, it'll roll off. And if your tire rolls off, you'll get hurt. So be extremely and correctly confident that your tire won't roll off.

Sunday, April 19, 2009

Racing - Plainville April 18, 2009

Saturday I went out and did Plainville. And yes, I did it despite not finishing my post on how to glue a tubular tire (I'm going to work on that after this little bit).

I've done Plainville before (once, twice, three times, and I got the first one on my helmet cam). I know the course, I know the wind tendencies, and I even know where it is (left, left, right, left, right, right, and that's from the driveway of the house - skip the initial "left, left" if you count driving in our little development as "part of the driveway").

In other words it's really close to the house.

I went specifically to repay SOC for some of the hard work he did at the last Bethel. Most of my team made the trip to Battenkill so I was sort of alone down here in CT. SOC's teammate had third place almost wrapped up, but two riders had a theoretical chance at passing him for that third overall. They'd have to sweep the points (two primes plus win the race), but still, it was possible.

Said third place overall rider was also up at Battenkill, so two of his teammates, SOC and Est, made the trip to try and protect his third spot.

Since I had no team, and the team didn't do anything at Plainville before, I went to help out SOC protect that third place overall.

We talked about how to approach this puzzle. The easiest thing would be to get someone other than the two contenders to win the first points prime, and then we could relax and work on bonus stuff.

Of course we threw around the idea of trying to sweep the points, both primes and the finish, because apparently that would get him or his team something.

After a little reality check, we decided the more conservative approach would work better for us. Neither of us are breakaway riders so we'd have to work things out in sprints, and those get a bit chaotic and unpredictable.

We arrived at the race at the same time and in short order we were spinning around a nice warm up loop that I had no idea existed until that morning. We went by a few guys from the two teams that held first and second overall (Blue and We-Chase-Blue, albeit a different team Blue from '07).

After a bit of pedaling around, we did a little jump to open up our legs. As SOC accelerated, I realized that I needed to do an even smaller jump to open my legs up so I could do the "little" jump. So I did about 3 pedal strokes at some absurdly low effort level, sat, and watched SOC, about 50-80 meters up the road, look around a bit bewildered since his warm up partner suddenly disappeared.

He looked back, saw me, and eased.

That's when I jumped pretty hard.

My legs didn't feel very good - I hadn't ridden the day before so I felt slow, sluggish, stiff. But that jump helped my legs wake up a bit, kind of like splashing cold water on your face shocks you into coherence. I caught my breath and decided that was enough.

We headed over to the course, ditched our LS jerseys, and after the Missus pinned on my number and gave me a good luck kiss, we lined up.

I saw, for the first time in maybe 20-22 years, a guy Dave. I read his name with a bit of shock when checking the results the prior week - back in the day he was a top notch racer, raced for Richard Sachs, placed 10th behind a certain Davis Phinney in the Boston Mayor's Cup Crit, and won numerous state titles as a Cat 1 or 2.

Now he was a 3, and he was in my race.

The kicker? He was the one guy that could take SOC's teammate's third overall.

I was hoping that he'd gotten really heavy or something, you know, like I did, but he looked just the same as he did before. Maybe not quite as cut, but the same oak tree legs, the same pedal churning power. Smooth as always, adept in the field, and tactically savy.

Like very savy.

I said hi to him, contemplated telling him I was actually riding against him, and before I could decide what to do we were racing.

To everyone's surpise, including me, I went after the first attack, a softening up attack by We Chase Blue. With me and a third guy tagging along, we went nowhere, but that little effort finally cleared up my legs. After a few laps of recovery I felt good.

I'd also managed to recon the course under fire. I mean, yeah, I know where it goes, but a course changes with wind and weather. On that day the weather cooperated - sunny, maybe 70 degrees. I raced in shorts and a short sleeve jersey, and I drank an unusual amount of fluids for a one hour-ish race.

The wind always seems more significant to me. I learned quickly that the wind mimicked the day I wore the helmet cam. From the left on the main stretch, a slight wind after Turn One, from the right on the back stretch, and a headwind just before the last turn, Turn Two.

I'd taught SOC to look for wind, and after watching him for a few laps, he looked like he read the wind the same way, and he sought shelter appropriately.

Cool.

For the next 15 minutes, SOC and I took turns looking after things. I'd watch moves, he'd watch moves.

His teammate went up the road in a little group containing both the race leader and I think the second overall guy. Their teams watched content at the front of the field, leaving the chase to those that had missed out. Although technically my team (Connecticut Coast Cycle) missed the move, I had an ally in the break, so I didn't want to chase.

A few solo type riders had to chase though, and Dave, with only one teammate in the field, needed to get up there to bring them back. He came up to my hip and murmured.

"We need to chase. The race leader is up there and everyone is blocking."

This was when I regretted not telling Dave that I was trying to help CVC. Dave rolled to the front, and him and a former collegiate teammate (of both of us) brought the break back.

SOC and I missed the first prime sprint (we didn't know it happened, although SOC gave me a heads up because he knew when it was scheduled to occur), but for the second one (which we thought was the first one of the day) we moved up aggressively. I watched the two overall leaders fighting it out for the win, and would ya believe it, the overall leader took the prime.

I was sitting just off those guys' wheels, and when they crossed the line, with Dave nowhere in sight, a huge weight lifted off my shoulders. SOC's teammate's third overall was officially secure. We could relax and race a race.

I glanced back to see what was going on - SOC sat on my wheel, a gap between him and the field.

"Hey, we can relax now!" I yelled.

He grinned back.

I tried to pull a bit but the field didn't want anyone leaving and they quickly regained our wheels.

A bit later someone offered me some inside tactical advice. I told him I couldn't take advantage of it, but SOC could. He nodded and I went and told SOC the tidbit. This galvanized SOC into action, to the point that Mrs. SOC was surprised on a particular lap when he came around the corner in a small break.

After what seemed like only a few minutes, Dave rode up to me again.

"5 to go."

I looked up and saw a big "5" looking back at me. I hadn't known where the lap cards were so it was nice to learn before it was too late.

I started looking for SOC. He saw me looking, interpreted the action properly, and eased over onto my wheel. This was good.

Only one problem.

We hadn't discussed the final sprint before the race - we'd focused on the numerical permutations for the overall and had decided that we really needed to protect the third overall before we thought of anything else. Problem was we didn't make any contingency plans, so now that his teammate's third was secure, our tactics were up in the air. The only known quantity was that I'd work for him.

With a slight cross-headwind sprint, it'd be best to go late, and to go on the left (because the wind came from the right). But by the time I figured that out, a few laps into the race, I couldn't really tell SOC because the whole field could listen in to my advice. I also knew that my legs were good for perhaps half a lap leadout, but it'd be a good, fast half lap. This meant I'd go on the backstretch at some point.

I could burn maybe another quarter lap match if I had some protection from the wind, i.e. if I was a bit far back and had to move up, I could do so from the first turn to the launch point on the back stretch.

Again, unfortunately, I couldn't share this readily with SOC.

Long time teammates who both train and race together will develop an almost uncanny ability to read each others' minds. A small nod or a subtle glance can convey paragraphs of information. SOC and I weren't there yet so I had to exagerate some of my nods and glances.

Therefore, every 30 seconds or so, for the last five laps, I'd turn around to check if he was there. If we had matching kits on, such actions would basically broadcast to the field "Hey! I'm leading him out! So if you want a leadout, get on his wheel! Okay?"

Long time or more experienced teammates would be a lot more subtle.

If I were in front, leading out someone, I'd look down, not back. I'd look for my teammate's fork, his front wheel, maybe even a unique mark we'd put on one of the two (some bright tape on the hub or fork works great). I'd conceal my looks with a face wracked with fatigue, so my glances down would appear to be that of a rider just about to give up. Folks watching would say, "Oh, he's supposed to lead out him. But man, that leadout guy won't make two downstrokes before he explodes." Then I hit hyperdrive and lead out my sprinter to a victory. Or something like that.

Alas, I didn't have those luxuries.

I'd sit up a bit, crane my head back, and look at SOC. Okay, he knows I want him on my wheel. And he looks pretty determined to hang onto it.

I tried not to take anything for granted, but I figured he knew it was five to go. Early in the race he'd noted we'd just covered fifteen minutes of racing, and the first prime hits at that time. We never heard the bell though so we didn't know if there was a prime. Whatever, SOC showed me he was much more aware of the race time than me. And I thought it'd be a bit hokey to point five fingers down to show him 5 to go, like a catcher signaling his pitcher.

For four laps we danced in the field. I'd choose the really big gaps if I had to move through guys, opting not to slither through the little ones. Luckily the field size allowed us to move around without too much problem.

In a 100 rider field, following a leadout man for five laps is practically impossible. It's more realistic to grab your leadout's wheel with maybe two laps to go, maybe one, and then fight to keep it.

It's hard though because a good rider can take your leadout man's wheel at will. It takes 5 to 20 seconds, involves no contact, and you're powerless to defend.

Luckily this doesn't happen all the time. Usually a leadout will benefit both the sprinter being led out as well as the guy behind the sprinter. So the fight ends up for the sprinter's wheel, not the leadout man's wheel.

In this case it'd be SOC.

The sprinter banks on this fight, and in fact when I was the sprinter, I've let other leadout men into the line in front of me because I figure that's another 100 meters of superfast leadout. A field with good teams (i.e. they're working together) usually approaches a field sprint led by a cluster of leadout men intent on drilling it almost to the line, followed by a cluster of sprinters all jockeying for position amongst each other.

As I remembered all this stuff I couldn't explain it to him, nor could I give him even hints of what to do. I had to rely on his wit, his ability to read race situations, his intuition, all those instincts, to carry him through the last few laps of the race.

We came up on two to go and things started getting organized at the front. We Chase Blue had a lot, and I mean a lot, of guys at the front. They had two guys off the front and were blocking like mad - they were trying to take the team overall, and getting first and second would help their cause greatly. Naturally the Race Leader (Blue) and his guys were chasing like mad, because they could also take the team prize.

We sat just behind all that.

The second last lap went by pretty quickly, nothing dramatic happening. I kept looking back at SOC and decided that I'd be burning my quarter lap match on the bell lap to move up, then going at half a lap to go. I decided it wasn't worth it to try and move up at 2 to go, only to have to fight like mad to maintain position. In all likelihood I could do it, but it's impossible to follow a wheel through that stuff, so SOC would be left out in the cold. Since my job was to lead him out, we had the luxury of skipping such efforts because we'd sacrifice one rider (me) to bring the sprinter (him) to the proper place at the proper time.

We came up on the bell lap, one to go, and now things were getting a bit heated, lots of yelling and stuff. Turn One got a bit crowded, but as the field exited the turn, things got nicely strung out. I knew I would see a bit of wind initially, but by staying left I'd hit the backstretch protected from the wind, and I knew I could go past the front at that point.

I surged out of the turn, on the left side, and hoped that SOC would follow me. Although a moderate effort for a last lap, maybe one that could be repeated twice before the sprint, on any other lap it might have been considered an attack. As I passed riders strung out in single file, I could see what was happening up front with the two man break.

The We Chase Blue break had disintegrated.

Gallantly one of the riders gave the other the biggest leadout he could, then sat up. His teammate had maybe 50-70 meters, but the way the field flew out of that turn, I didn't think he had a chance.

The field gravitated towards the guy coming back from the break, looking for shelter. The exploded break rider went almost to the left curb to get out of the way. And the field veered as if to tag him, pausing ever so slightly in their efforts. We Chase Blue didn't want to pull and no one else wanted to open up the sprint.

I decided I'd open the sprint.

I had built up some good momentum and had to go left since the field had strung riders from the right curb all the way to the exploded break rider to the left. I hoped he'd left a little gap, that I wouldn't have to brake, and as I went left, still in my "moderate" effort level, I knew that I'd have maybe two or three inches to spare.

I went left. And yelled.

"LEFT!"

I went by him and accelerated. Now I was committed.

I wasn't sure that SOC would be able to follow - in fact, I felt pretty sure he wouldn't be able to, simply because he has wider bars than me, and if I had his bars, I wouldn't have gone through the gap.

However, I hoped that by opening up the sprint, I'd get the long strung out field to straighten out a bit, and since SOC had been carrying more speed than the field, he'd be able to slot in as soon as he saw a gap.

I don't know what he did though. I didn't have the luxury of turning around anymore. I sprinted up to and past the poor break rider. He moved right and eased, knowing that the field would be flying by him.

Just before the last turn I did something odd, though, and my left foot, or rather my left ankle, smashed into the let chainstay on the upstroke. My shoe popped out of my pedal.

I looked down to clip back in, but the pedal spun wildly on the crank. It took a few jabs - I don't remember how many - before I got clipped in. The SRM says I spent two seconds fumbling around, so that's not too bad. I remember one guy (not SOC) going past me as I did this, and it ends up he won the race.

I got through the last turn and started sprinting. My legs immediately screeched in protest and I thought, "Oh, good, I can practice sprinting when I'm totally dead!"

I did about two more pedal strokes and realized, okay, this is why I jump late, not early. I can't move my legs anymore.

A few guys whizzed by me so I raised my hand to indicate a problem, a biological in this case. I coasted across the line 11th, apparently, with SOC actually getting money with his 6th place finish.

After the race we rehashed some stuff, but the big surprise was that SOC had gotten 6th without realizing it was the last lap of the race. He just "followed" the guys going for the "prime", but they all sat up after the sprint. That's when he realized that maybe it was the end of the race.

Overall though it was a good race. Our focus on race objectives helped mask the pain of effort - a sense of purpose really helps motivation, and we both gave it our all for someone who wasn't even there. We worked well together and in the end, although the leadout wasn't successful in an exact sense (since SOC wasn't on my wheel), I learned that I can, in fact, lead out someone pretty well.

Friday, April 17, 2009

Life...

I'm not meaning to tease but I still haven't finished gluing my tires. Therefore it'll be another day or so before I get the second half of the tubular tire post...

Wednesday, April 15, 2009

How To - Removing A Tubular

The wheel which needs (wants?) a new glue job.

In this particular instance, the wheel is actually out of true. Since the tire has to be removed to get to the spoke nipples, I had to remove the tire. This is a significant disadvantage with wheels with hidden spoke nipples like the Reynolds, especially if you have tubular tires.

I should point out that my wheels went out of true because things like banquet tables, leaf blowers, and heavy podium crates and boxes fell onto them regularly over the course of a Bethel Spring Series. It was so bad that at one race I had to race on a spare front wheel.

A properly glued tire barely peels away from the rim, even with considerable force. The tire is deflated in this shot to illustrate that air pressure has nothing to do with a tubular tire's security on the rim.

I'll start removing the tire opposite the valve.

I pull up what I can to expose the glue-rim seam. It's virtually impossible to pull a well-glued tire off with just your hands. Therefore I use tools.

In this case I practiced my expert Ninja skills.

I walked across the room and threw a throwing star at the wheel.

Okay, I didn't. But if I could have done it, I would have done it.

Instead I did it the unromantic way - I just gently jammed a 16T cog in there. I purposely chose the 16 because that's a really good gear for steady state riding on the flats.

Okay, I really did this because my toolbox, with my slot-type screwdrivers, was in the car, outside in the cold, and I was in my PJs. Normally I'd use a screwdriver and gently, barely touching the rim, pry the tire off. It takes a while but it works.

Failing a screwdriver you can use any sort of pointy flat thing, like a 16T cog.

Or a throwing star.

In my case I didn't have a throwing star, but I did have a 10 or 15 pound box of "cogs that can't possibly be useless so I'll move it around with me and tell the missus that these cogs can't be useless to me".

I used the 16T. See? Not useless. Now about the other 150 cogs...

Back on track. Be gentle with your throwing star, cog, or screwdriver if you're reusing anything you're touching - tire or rim. Cutting up a good tire is a great way of ruining your day. Irreversibly damaging a tubular rim is a second great way to ruin a day.

Once the tire is dismounted enough that you can get something the size of a chopstick under the tire, put something the size of a chopstick under the tire.

Actually, a real bamboo chopstick (they're rounded with a rectangular type non-eating end and a pointy eating end) works excellently. When I was a kid, I'd borrow such things from the kitchen drawer.

However, nowadays we're down to two pairs of chopsticks in our household and I really like using them to each chicken wings. So I had to improvise.

I used a screwdriver.

Once I can get a screwdriver under the tire, I shove one in. Then I turn it so it rolls along the rim, peeling off the tire as it goes.

This peels the tire slowly and steadily by default, simply because it takes a lot of effort to turn the screwdriver. Be careful with the rim - the screwdriver can damage the high points of the rim (the two sides of the gluing surface). A chopstick is better because it's softer and will "give" a bit. They break regularly though so that's a disadvantage.

If the tire is really tight on the rim I'll lift the screwdriver away from the rim (holding the rim between my toes and lifting on the screwdriver while turning it), but on an older tire that is loose fitting, you can just let the screwdriver roll along the rim.

After enough of the tire is off, you can grab and peel. Note how close my thumb is to the rim. Note also how clean the rim is - this is not normally the case, but on carbon fiber rims it seems sort of common.

If you don't care about the tire's integrity (i.e. it's shredded or worn or punctured badly), just yank. If you want to be able to use the tire again, pull slowly, steadily, and within an inch or two of the rim.

See how my thumb is close to the rim in the above picture? I would peel off maybe 5 mm or a 1/4 inch of tire, reset my hand, and do it again. Do this quickly, efficiently, and your hand will travel inchworm-like around the rim.

Don't pull perpendicular to the rim, pull in the direction of the rim. This slow, steady, close peel prevents the casing from ripping. Rip a cord in the tire and you might as well have cut it in half. A damaged casing is useless as a tire and dangerous to ride. Cut up cleanly, with the label and the valve preserved, it would make a good prop to show people exactly what a tubular tire is like.

I don't have a cut up example, else I'd stick a picture of it right here.

Finish at the valve so you can pull the tire off off without ripping the valve off.

Presto, you're done.

Now for the hard part - gluing on the tire. I'll save that for the next post.

Tuesday, April 14, 2009

Story - Mister Landry

A few months ago our mail included a little padded package from up north.

Maine.

Home of (other than my little bro) moose, the only Forest Ranger person I know (and who is in the hardware store biz too), and one Mister Landry.

The package contained a particular shop apron, one with a Picasso-esque rendition of Tom Ritchey wielding a brazing torch. I say "particular" because that was my shop apron, one that I wore, on and off, for some of the interminable time I spent wrenching bikes at the shop.

Bella, looking up at me, with Hal to her side. Oh, and the apron below Bella.

I have no idea how it ended up in Maine, but it came back via one Mister Landry.

Mister Landry became probably one of my most ardent supporters when it came to me and the bike business. After I closed shop and went into non-bike work, he unsuccessfully tried to coax me back into that two wheeled world, with all sorts of different ideas and such.

Normally this took some form of "I'll handle the finances, you work the shop. No? Okay, how about you run the shop and I'll handle the finances. Or, if you want, you can not do the finances and I'll stay out of the shop. Hey, I have an idea! How about I run the back office and you run the storefront? Well? Whadaya say?"

After having just ended just about 15 years in the biz, I felt properly burnt out and politely declined every single offer headed my way. Normally I'd say something like, "Look, I don't know where you've been, but the last thing I want to do right now is wrench a bike. Or talk bikes. Or look at another el cheapo canti brake that just won't stop squeaking. Leave me alone."

"Politely" means me saying the same thing without saying "Leave me alone" at the end. Because Mister Landry was a good friend, I left the last three words out when I turned down his offer.

I think part of this ardent support evolved through the cognitive dissonance he experienced when he first tried to defeat my team (he was on a rival team), then tried to help me (he joined my team and tried to bring everyone on his team to my team).

He rallied my cause, acting as an unpaid road rep, encouraging his friends to patronize the shop. This ended up with his (and mine, to be honest) friends rolling in to buy stuff ("and charge me enough so you make money"), good stuff, not just a tube or two. Campy kits, Zipp wheels, usually hung on a local framebuilder's frame. I have to admit that the first day I had the shop, he came in and, because he didn't need anything, he bought a bunch of tubes.

He had an infectious enthusiasm which affected all those around him. I'd never, for example, dreamed of driving up to Maine to get my butt kicked by Frank McCormack in a big P123 race, but somehow he convinced me it'd be a good idea.

Part of his convincing took form of a lobster named Larry (Mister L used to catch various seafood creatures). He brought one in, left it for the now Forest Ranger, with a note taped on it "I'm Larry the Lobster and I'm lost. Please bring me back to Maine." Or something like that.

Forest Ranger found Larry walking around the store and took him home. And cooked him. And we all clambered into Mister L's minivan and make a team trip up north where we all got our butts kicked by Frank McCormack.

He stayed on for a few extra days and let me drive his minivan back, loaded with a few bike racers, his wife, and all the associated gear. Just as we were about to leave, he looked at me and smiled.

"You know, my record for getting back home is 4 hours and 30 minutes."

Four hours fifteen minutes later, along with a few scares (when the wife jolts upright from sleeping I'd slow down a bit), we arrived back at home.

The minivan never recovered and he had to get rid of it shortly afterwards.

"Mister Landry"

The minivan did have a prior "experience". As you can imagine, Mister L could convince anyone of anything (except to get me back into bikes).

Somehow one of the things Mister L did was convince his just-under-teen daughter that it would be a great birthday party if she and all her birthday party friends piled into the family minivan (roof rack bristling with bike racing weaponry, his custom frame sporting a beautiful Campy kit, his pride and joy Zipp racing wheels alongside his more austere FiR training wheels) and made a couple hour drive into some foresaken place in NJ or PA or something and go watch a bike race.

Which, conveniently, had a race for Mister L's category. And, you know, while they're all there, he might as well race.

What coincidence, eh?

Anyway, getting a whole bunch of 12 year old girls a couple hundred miles down the highway takes a lot of patience. Lots of giggling. Shrieking. And the inevitable.

"Mister Landry, are we there yet?"

And, of course, the other inevitable.

"Mister Landry, I need to go to the rest room."

Now, since 12 year old girls are on the cusp of womanhood, the latter statements simply cannot be taken lightly. Mister Landry has daughters so he understands. Therefore he'd duly pull into the next rest stop, or take the next exit, and release the flock to the Ladies Room.

Of course two or three would stay behind, taking the opportunity to gossip about one or the other, and, when queried by Mister Landry, they'd tell him that "They didn't need to go."

After an interminable stop, the girls would get back into the poor minivan, Mister Landry would start down the highway, and the girls that didn't go would, of course, suddenly need to go.

Like Right Now.

So Mister Landry would take the next exit, or hit the next rest stop, and the whole procedure would repeat itself.

Combining this with the stress of trying to get to the race on time, trying to find said race, and all the while trying to be a good host to all his daughters friends, and you get one very frazzled Mister Landry.

So after the umpteenth stop, the banishment of all liquid refreshments, hand raising before talking to Mister Landry, and a new rule called "You can't ask how far until we're there", the girls settled in a bit. Mostly because Mister Landry was about to break down, and even a 12 year old girl could see that. Or a bit of steam coming from his ears, one of the two.

Of course, at some point, one girl finally gathered the courage necessary to raise her hand.

"Mister Landry, is it possible for something to fall off the roof, like a bike wheel?"

A big sigh from the front. Then a syllable by syllable explanation by a frazzled Mister Landry.

"No. They're all very secure on the roof using something called a skewer. The bikes are locked, and the wheels are all tight. I double checked them."

"Are you sure?"

"Of course I'm sure!"

The quick reply subdued the girl. She sighed in a resigned way. Adults have no clue.

A few minutes later, she raised her hand again.

"Mister Landry?"

"Yes, what do you want now?"

"Are you sure a wheel can't fall off?"

"I'm positive. Why do you ask?"

"Because I think one fell off back there."

EERRRRRRrrrrrrr. <--- brakes screeching

The minivan pulled over. Mister Landry did a quick survey of the forest of roof rack things. Bike, wheel, wheel, wheel, wh.... no wheel.

His heart sank. It was a Zipp.

He dropped back down to the ground and got back in the driver's seat.

"Okay girls", he smiled a brave smile, "We're going to go treasure hunting!"

"We are?" Lots of suspicious eyes.

"Yes, we are. This is what we're looking for. See this wheel? We want to find one just like it, except it doesn't have the gears in the middle. We have to look on the side of the highway, so keep your eyes peeled."

"Do we get anything if we find it?"

"Um, I'll buy everyone ice cream."

Blank stares.

"Um, second helpings?"

Blank stares.

"How about money?"

Oh. A reaction.

After some very touchy negotiations, the girls were on board (honestly I don't recall if money entered the equation, but it was something important to a twelve year old girl). Mister Landry got on the other-bound side of the highway, back tracked for about 10 minutes (because that's when the girl noticed the wheel bouncing down the highway behind the minivan), and got back on the right-bound side of the highway.

Then he searched and searched and searched and searched.

No wheel.

And, because of all the rest stops, the treasure hunt, and everything else that could go wrong, no bike race. Mister Landry announced that they would go home and do something there for the birthday party.

Like have cake. And open presents. And stuff.

The girls cheered.

I have yet to see him in person - I think the last time I did was over ten years ago. But one of these days I'll be visiting my brother up in Maine. And on the way there, or on the way back, I'll have to make a detour. See Mister Landry.

And thank him for the apron. In person.

Sunday, April 12, 2009

Track - Preparing for the 2009 Season

So the New England Velodrome (NEV) is open for "open riding" this month, April. This means, I guess, that one can go there and get used to the fixed gear while outside, not while on rollers or on a trainer.

It also means that racing will start soon, and in the case of NEV, it'll start in May.

And, just like any other year, I've left the winter "to do" list to lay dormant while I did other "more important" things. So now I find myself wondering if I can get my bike in shape before the first race in May. (Obviously I can race it as is, but last year I figured out that I need to change some things to optimize the bike).

As a review, here is my bike, as it is now, with all its winnings sitting at the foot of the cranks:

Total winnings: A bottle and a cap.

So, to go along the "to do" list from the post above:

1. Gearing.

I currently have a 50x15. And only a 50x15. I'd like to run a 49x15, with the option of going to a 48x15. Based on some extremely complex gear calculations, I'd like to be able to run a 46x14 and a 53x16 as well. Basically I'd like to be able to run, with the 15T, an 86.4" gear (48x15), 88.2 (49x15), and the 90 (50x15) I currently have. The 46x14 gives me an 88.7, slightly bigger than the defactor 49x15. The 53x16 gives me the only gear in the 89s, an 89.4.

On the track, unlike the road, one must decide whether to run a 3/32" chain (road chain) or a 1/8" chain (BMX type chain). Road chains are slim, pretty, and flexible, the last because they need to shift from cog to cog. Track/BMX chains are fat, unwieldy looking, and very stiff, because heaven forbid the chain even thinks about moving from one cog to... well, to nothing.

Right now I run a 3/32" set up because, frankly, it's all I had in the early 90s when I made that fateful trip to T-Town. And when I first bought the track cog, I got a 3/32" because I figured the drivetrain would be lighter. Plus I wouldn't have to buy a chainring - I already had a 50T and a 51T, and who would want a lower gear? I never knew about the flex thing, and I didn't know about a big gear's handicap in any race with slower than fast speeds.

Since I have to (well, want to) buy two chainrings, it's not much more to buy a third, and while I'm at it, I can easily buy a cog or two. BMX chains are cheap, so that's easy.

Therefore the question is, 3/32" or 1/8"?

A related question is "Which crank should I use?" I have a few cranks, not too many bottom brackets, and getting new cranks would entail a BB plus all the above chainrings. If I stay with a 130mm bolt circle crank (Shimano and the like) as well as the 3/32" chain, then I have a chainring, cog, and a chain. I'd only have to buy more chainrings.

If I go with my 135mm bolt circle Chorus cranks, I have to get a BB plus a slew of chainrings (and decide between 3/32" and 1/8").

Or I could go with the 144mm bolt circle diameter (BCD) "track standard". Since I gave away all my 144 BCD cranks and chainrings to Gary in Florida, I'd either have to ask for some of them back (I had a 45, 46, 49, 51, 52, 53, 54, if I recall correctly) or go out and buy a bunch of chainrings.

I'm mulling all that stuff above over, and have been for a bit.

Since I treat life like tests, and tests like life, and the rule is if you can't solve one problem right away you should go to the next question (and return to the unsolvable one later), I'll move on.

2. Too much weight forward.

I never thought this would be a problem for me, but at the track, once I got up to speed, I realized that the bike's rear seemed awfully skippy. Like sliding skippy, not like sticky Skippy peanut butter.

I'm currently running a radical 140 mm track stem. It's beautiful, in an industrial sense anyway, but with the extremely deep drop bars, it's a bit much for a moderate speed track like NEV. I need to move some weight to the back of the bike, so I'll need to do one of two things - a shorter (and probably taller) stem, or use bars with less than a crazy amount of drop.

Since I can't use the track bars anywhere else (too low for my road bike), I'm inclined to try a shorter, taller (level) stem, maybe a flat 110 or 120 mm stem. Failing that I'll use a pair of my precious road crit bend bars because I'm used to sprinting on those things.

Either way, I'll need to experiment. The nice thing about a track bike, especially one with a quill stem, is that it takes one bolt to swap out a whole bar/stem set up. No cables, no fuss, no muss. Just loosen the stem, yank out, then reverse with the next set. I could show up with two sets of bar/stem units, one with the track bar, one with a crit bar, and decide which one I like better.

Heck, I may even set up my old cowhorns on a stem so I can have a "pursuit" bike.

3. Wheel, Front.

My current front wheel is one of those standard replacement wheels, if there were such a thing for "standard track bikes". It's akin to the front wheel you get for your 30 year old Schwinn Traveler III (or mine, if I still had it). Effective by definition - it's round and rolls - but definitely no frills.

The guy Scott who demolished me that last week of racing in 2008 runs a TriSpoke front. I have a TriSpoke front wheel. I even have two of them! Therefore, I thought about running the TriSpoke up front. More aero, cool looking, and, with the brake track a bit bent on the wheel, my tubular TriSpoke isn't really ideal for riding when you have brakes, but it'll work fine with no brakes. Therefore it would be great on the track.

To convert the TriSpoke to a front track wheel, I need to get a solid axle and axle nuts (since track racing forbids quick releases). I'll have to order that, then I can glue on one of my used tubulars, and I'll be set.

Really all I need to do is find my TriSpoke track axle because I already own one, but I can't, so I'll have to order one.

Actually I should go look for it now - I've been steadily making the bike workshop room more of a bike workshop room, and that means all the boxes of parts are sort of in one area.

4. Wheel, Rear.

If I can get a Surly Fixxer to work on the rear cassette TriSpoke, I'll do that. Then I'll have a pair of TriSpokes. The aforementioned Scott said that he tried it on his rear wheel but his (and my) generation of TriSpoke is incompatible with the Fixxer. If so I'll figure something else for it, like find some Ultegra rear hub wheel and put the Fixxer on that thing.

My current rear wheel isn't too bad so I can use it as is - it's a 32 spoke Suntour Superbe high flange hub, laced with a very narrow Sun M17 rim (albeit with straight spokes). I'd like to relace the wheel with lighter spokes (just because) and maybe a wider rim (I have a few laying around). Then I can put a slightly wider tire on it (it's a 19mm right now). Maybe one of my just recently dismounted 21-22 mm crit tires. The tires are a bit worn for racing a crit, but I think they'd work well on the rough surface at NEV.

The Surprise

The final bit of the equation popped up the other night when the missus told me that she wants to sponsor my track racing a bit. She knew that I was missing some "stuff" but she wasn't sure what to get me. In particular she was impressed with a guy's kilo helmet at Bethel - it's designed to be aero no matter which way your head turns. The guy's teammate explained this to both of us as we were chatting in the registation tent, and obviously it struck a chord.

I immediately started researching these things and learned that cost a few hundred dollars, and I really couldn't justify getting a helmet like that.

The missus, though, figured on exactly that "can't justify it" bit, and deduced that it would therefore be a good gift. She outright asked if I'd want a helmet like that. She'd even pay for it.

Would you believe I told her no?

Now, before you berate me for saying such a thing, I pointed out that such a helmet would be good only for a year, they'll probably be illegal next year, at least for USAC, because they only meet European safety standards, and therefore there'd be no guarantee it'd be legal for racing in 2010.

She took this in stride and asked if I needed anything else for my track venture.

Funny she should ask.

I launched into what has become this post, and although she tries very hard to follow the various bike geek terminology, she quickly understood a few things.

1. Since I can't shift gears, and I only have one gear that's a bit big, it'd be better for me to get more gears.
2. Since I have a crappy front wheel, it'd be good if I could get myself a better one.
3. Since I have a couple front wheels that could easily be used on the track, I should do that.

She amended her sponsorship offer based on the above conversation and asked if she could help pay for my chainrings, cogs, potential chain, and even axles and such.

This time I told her yes, she could.